In this guide/video, we’ll show you how to add an image logo into a PDF file.
This is a very useful skill to have if you want to create a PDF document that you can share with others.
We’ll walk you through the steps of how to add an image into a PDF page(s), and by the end of the guide/video, you’ll be able to add logo’s to pages in a PDF file with ease! Easy step-by-step guide.
Adobe Acrobat can be downloaded here: https://www.adobe.com/uk/acrobat/free-trial-download.html
Don’t forget to check out the video and subscribe for further pdf tips.
Step by Step Guide
- Make sure Adobe Acrobat full version is installed
- Open the PDF in Adobe Acrobat
- Click “Edit Pages” in the right-hand sidebar, if it doesn’t exist select the Tools menu, then the “Edit Pages” icon drop-down menu, “Add Shortcut”
- In the Edit Pages window, in the top bar click “Add Image” button, find the image logo you want to use and click “Open”

- Now resize the image to your desired size and move to the correct location, todo this left mouse click on the image and then left mouse click on the bounding box circles, keep left mouse clicked and move your mouse up or down to the right or left to resize the image to simply move the image around left mouse click on the image and keep it clicked and move the mouse to the desired location

- Once complete, Click the “Close” button
- To add the same image now to multiple pages manually click on the image and right mouse “Copy”
- Scroll down to the page you want to add the image to and left mouse click anywhere and press CTRL+V keys or right mouse “Paste”
- To add an image to multiple files or many 1,000’s of pages you need to use the watermarking method
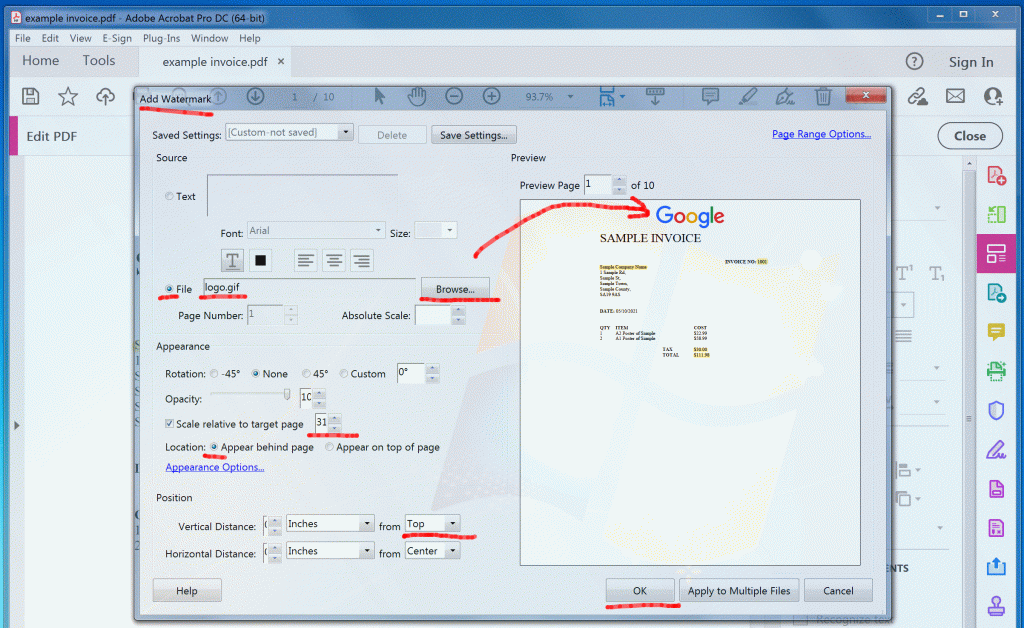
- To do this, start with a new pdf, click “Edit PDF” from the sidebar and click the “Watermark” menu, “Add”
- In the watermark setup click the option “File” radio button (circle), which is near the middle of the screen, then click the “Browse…” button, in the filename box enter *.gif for gif file or e.g. *.jpg for jpeg, then navigate to the location of your image and click “Open”

- Click the option “Appear behind the page” radio button (circle)
- To resize the image click the “Scale relative to target page” number down to make it smaller or up to make larger
- To resize / Position the image in the vertical distance click “Top” from the dropdown items. default is “Center”
- Click “OK” button to apply then click “Close”
- To save go into the file menu, Save or SaveAs